Attiny85 USB Board Firmware Upgrade!!
22. 08. 31.
Translated by Claude Opus 4.5
AI-generated content may be inaccurate or misleading.
Prerequisites
- Any Arduino capable of uploading sketches via computer (probably)
- A few jumper cables (exactly 6)
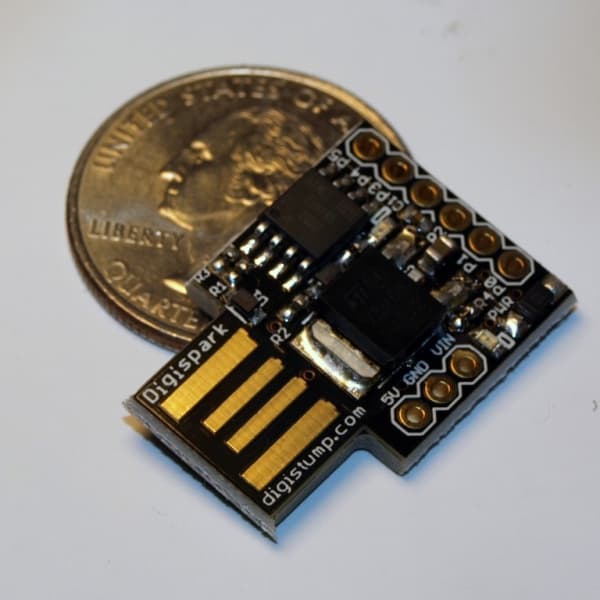
- The Digispark USB Development Board shown in the photo below
*ISP in this article refers to In-System Programming.
What is Attiny?
It's a microcontroller released by Atmel.
Among AVR microcontrollers, it's characterized by generally lower specifications compared to the ATmega chips used in Arduino, and accordingly, they're typically smaller in size.
The attiny chip used in this article is the attiny85 chipset, and for convenience, I'll be using a Chinese clone board based on the board designed by Digispark.
This board features a PCB designed as USB Type-A, allowing direct connection to a computer.
Tasks to Perform in This Post
Both Digispark originals and Chinese copies have varying firmware versions. The latest firmware version I'll explain later is 2.6, but originals come with 1.02, and Chinese versions sometimes don't have any firmware at all. Therefore, we'll upgrade the firmware to version 2.6 regardless of whether it's original or copy.
- Set Arduino as ISP
- Upload Micronucleus V2.6 to the board using ISP
- Install Digispark USB driver
- Upload a sample project to the board to verify proper operation
About the Firmware Micronucleus
First, we need to know a bit more about this interesting board. It has a USB port but no separate hardware for USB. Huh? Then why does it have USB? Because the attiny85 chipset supports v-usb... no, almost all Atmel AVRs support v-usb functionality. It remarkably supports USB through software using digital ports. Using this v-usb, you can upload projects without an ISP, and the firmware that supports this is Micronucleus.
Simply put, there are 2 ways to program via USB:
- Programming directly to the board memory using ISP
- Uploading Micronucleus as a bootloader to add v-usb support to the board and uploading via USB
Each has advantages and disadvantages. Method 1 requires the effort of connecting an ISP, but you can use all of the attiny85 programming memory. Method 2 allows simple programming via USB instead of connecting an ISP, but you have to give up some programming memory to the Micronucleus firmware. This is convenient but has limitations when uploading large programs.
Anyway, since we've decided to upload the firmware, this post will explain how to do method 2.
Maybe later I'll write an article like "attiny85 without micronucleus"?
Making Arduino into an ISP
Actually, this step isn't necessary if you have something like an AVR ISP mkII. But I'm a student, and it's hard to buy an ISP that costs at least 20,000 won~~, or rather, I haven't found a reason to buy one yet~~. So let's use an Arduino that everyone (?) has at home as a temporary ISP. (Actually, even if you don't have one at home, there's usually an Arduino lying around somewhere in most middle and high schools, right?)
- Connect the Arduino to the computer.
- Open Arduino IDE and select
File > Examples > 11.ArduinoISP > ArduinoISP. - Upload the sample sketch to the Arduino board.
Now the Arduino acts like an ISP.
Wiring Between Arduino and attiny85
| ATtiny85 pin | Arduino Pin | Role |
|---|---|---|
| 5V | 5V | VCC |
| GND | GND | GND |
| P5 | 10 | Reset |
| P0 | 11 | MOSI |
| P1 | 12 | MISO |
| P2 | 13 | SCK |
Just connect them properly with the prepared jumper cables.
Download Required Files
You need the firmware/releases/t85_default.hex file from https://github.com/micronucleus/micronucleus.
You can download it from this link.
Burning Firmware with avrdude
"C:\Program Files (x86)\Arduino\hardware\tools\avr/bin/avrdude" ^
-C "C:\Program Files (x86)\Arduino\hardware\tools\avr/etc/avrdude.conf" ^
-v -pattiny85 -cstk500v1 -PCOM6 -b19200 ^
-Uflash:w:"%USERPROFILE%\Downloads\micronucleus\firmware\releases\t85_default.hex":i ^
-U lfuse:w:0xe1:m -U hfuse:w:0xdd:m -U efuse:w:0xfe:m
*Line continuation in cmd uses ^(caret). By the way, pwsh uses `(backtick)
We're using avrdude which is downloaded along with Arduino IDE. In the command above, replace "%USERPROFILE%\Downloads\micronucleus\firmware\releases\t85_default.hex" with the path to your downloaded t85_default.hex file.
Also, change the -PCOM6 option to match the port number of the Arduino you set as ISP.
In my case, COM6 was the Arduino, so I set it to -PCOM6.
Now we're done. Run the slightly modified command in CMD and the firmware upload will proceed. If you see the following text, it's successful.
.
.
avrdude: input file 0xfe contains 1 bytes
avrdude: reading on-chip efuse data:

Reading | ################################################## | 100% 0.00s

avrdude: verifying ...
avrdude: 1 bytes of efuse verified

avrdude: safemode: lfuse reads as E1
avrdude: safemode: hfuse reads as DD
avrdude: safemode: efuse reads as FE
avrdude: safemode: Fuses OK (E:FE, H:DD, L:E1)

avrdude done.  Thank you.
If you've succeeded up to this point, you've successfully installed version 2.6. Alternatively, you can modify only the firmware file above and try the speedloader firmware from https://github.com/ArminJo/micronucleus-firmware with various options enabled, or downgrade to micronucleus 1.02, the last officially supported version by Digispark.
Digispark USB Driver Install
- Download
Digistump.Driver.zipfrom https://github.com/digistump/DigistumpArduino/releases - Extract the archive
- Run and install
Install Drivers.exe
Now the driver is installed. With a few settings in Arduino IDE, you can upload code using v-usb.
- Run Arduino IDE
- File > Preferences
- Add
http://digistump.com/package_digistump_index.jsonto Additional Boards Manager URLs - Click OK
- Tools > Board > Boards Manager...
- Search for digistump and install
Digistump AVR Boards
Setup is complete. Let's upload test code.
Uploading a Program That Types "HelloWorld" as Keyboard
Create a sketch and enter the following code.
#include "DigiKeyboard.h"

void setup() {
  pinMode(1, OUTPUT);
}

void loop() {

  DigiKeyboard.update();
  DigiKeyboard.sendKeyStroke(0); //For compatibility with older devices
  DigiKeyboard.delay(500);
  DigiKeyboard.println("HelloWorld");
  DigiKeyboard.delay(1000);
  DigiKeyboard.println("HelloWorld");

  for(int i=0; i<=10; i++) {
    digitalWrite(1, HIGH);
    DigiKeyboard.delay(100);
    digitalWrite(1, LOW);
    DigiKeyboard.delay(100);
  }
}
This code types HelloWorld twice and blinks the LED 10 times. Let's proceed with the upload.
- Tools > Board > Digistump AVR Boards > Digispark (Default - 16.5mhz)
- Ctrl + U // Code upload shortcut
When you see the following text, connect the attiny85 board to the USB port.
Sketch uses 3194 bytes (53%) of program storage space. Maximum is 6012 bytes.
Global variables use 98 bytes of dynamic memory.
Running Digispark Uploader...
Plug in device now... (will timeout in 60 seconds)
After connecting, if you see the following output, the upload was successful.
> Device is found!
connecting: 16% complete
connecting: 22% complete
connecting: 28% complete
connecting: 33% complete
> Device has firmware version 2.6
> Device signature: 0x1e930b
> Available space for user applications: 6650 bytes
> Suggested sleep time between sending pages: 7ms
> Whole page count: 104  page size: 64
> Erase function sleep duration: 728ms
parsing: 50% complete
> Erasing the memory ...
erasing: 55% complete
erasing: 60% complete
erasing: 65% complete
> Starting to upload ...
writing: 70% complete
writing: 75% complete
writing: 80% complete
> Starting the user app ...
running: 100% complete
>> Micronucleus done. Thank you!
Right after upload, the board reconnects and waits 6 seconds for code upload. After that, it reconnects again and operates in HID mode. It will be recognized as if a person is typing directly, and it will type HelloWorld twice at the cursor position. Then if the LED on the board blinks 10 times, it means all the processes in this post were successful. Also, during the upload output, there's a part like this:
> Device is found!
connecting: 16% complete
connecting: 22% complete
connecting: 28% complete
connecting: 33% complete
> Device has firmware version 2.6
It intuitively tells you firmware version 2.6!! For the next attiny post, I'm thinking of making a USB rubber ducky using a speedloader that runs the program immediately upon connection.
Published:
Modified: