WSL Development Environment Setup (with asdf)
apt, homebrew, nvm, pyenv... We live with too many version management tools. Let's at least manage programming language versions with a single tool!
Translated by Claude Opus 4.5
AI-generated content may be inaccurate or misleading.
update log
| Date | Changes |
|---|---|
| 2022/02/18 | First post written |
| 2022/03/06 | Typo fixes |
| 2022/08/02 | Typo fixes, asdf install command version update, added recommended plugin list, modified text for easier CNP, minor updates to latest settings |
Overview
When setting up a development environment on Windows, there were several inconveniences.
A package manager that exists but is still lacking (winget)
A non-POSIX terminal that ignores the basics
Many CLI-based tools that don't support it
A PATH that becomes impossible to untangle once it gets messed up
Admittedly, some of these inconveniences and problems might stem from not knowing Windows well.
But fortunately, Microsoft provides an almost perfect system called WSL, so of course we should use it.
Anyway, let's install WSL properly.
Usually you can install it with wsl --install -d ubuntu or download it from the Windows Store.
After rebooting, Ubuntu will auto-start and allow you to set up your Linux user.
Follow the instructions below.
Software Update
sudo apt update && sudo apt upgrade -y && sudo apt autoremove -yvscode remote setup
Install the Remote - WSL plugin in vscode
Type code . in the terminal
Git Setup
sudo apt-get install git
git config --global user.name "Your Name"
git config --global user.email "youremail@domain.com"
git config --global credential.helper "/mnt/c/Program\\ Files/Git/mingw64/bin/git-credential-manager.exe"
Resolving git line ending issues between Windows CRLF and WSL LF
Docker Installation
// cmd or pwsh

winget install docker.desktop
docker desktop >> settings
General >> Use the WSL 2 based engine
Resources >> WSL INTEGRATION >> (turn on)
zsh, oh-my-zsh, p10k theme Installation
sudo apt install zsh
sh -c "$(wget https://raw.github.com/ohmyzsh/ohmyzsh/master/tools/install.sh -O -)"
git clone --depth=1 https://github.com/romkatv/powerlevel10k.git ${ZSH_CUSTOM:-~/.oh-my-zsh/custom}/themes/powerlevel10k
For the beauty of the p10k theme, choose one of Nerd Fonts, Source Code Pro, Font Awesome, or Powerline fonts, install it on Windows, and then change the terminal font.
** Only when using Nerd Fonts can you enable all p10k theme settings.
(Meslo Nerd Font recommended)
In the ~/.zshrc file,
change the line ZSH_THEME="robbyrussell" to ZSH_THEME="powerlevel10k/powerlevel10k"
Apply the p10k theme with source ~/.zshrc.
A configuration wizard will appear - set up your preferred theme.
If you want to reconfigure later, use the p10k configure command.
The author configured it as follows.

oh-my-zsh Plugins
# zsh-syntax-highlighting
git clone https://github.com/zsh-users/zsh-syntax-highlighting.git ${ZSH_CUSTOM:-~/.oh-my-zsh/custom}/plugins/zsh-syntax-highlighting

# zsh-autosuggestions
git clone https://github.com/zsh-users/zsh-autosuggestions ${ZSH_CUSTOM:-~/.oh-my-zsh/custom}/plugins/zsh-autosuggestions
Add the following to the plugins section in the ~/.zshrc file.
plugins=(
  zsh-syntax-highlighting
  zsh-autosuggestions
)
Recommended Plugin List
plugins=(
  z
  gh
  git
  httpie
  sudo
  rust
  copypath
  direnv
  golang
  python
  docker-compose
  docker
  asdf
  zsh-syntax-highlighting
  zsh-autosuggestions
)
source .zshrc
Terminal Input Issue Fix
Due to some unknown issue between Windows Terminal and oh-my-zsh,
there's a problem where text is pasted one character at a time slowly when pasting in the terminal.
Hopefully it's gone by now..
To fix this, add the following line to ~/.zshrc.
DISABLE_MAGIC_FUNCTIONS="true"After running source ~/.zshrc or restarting the terminal, you'll notice the issue is gone.
Recommended Terminal Tools
bat Installation (clone cat)
bat_version_amd64.deb <- download
sudo dpkg -i bat_version_amd64.deb
Add to .zshrc
alias cat="bat"Now cat has been replaced with a prettier version
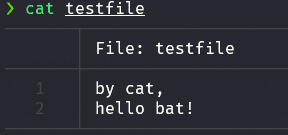 A useful option to remember is
 --plain.
It changes to the following, making it easier to copy.

logo-ls Installation
logo-ls_amd64.deb <- download
sudo dpkg -i logo-ls_amd64.deb
Add the following line to zshrc
alias ls="logo-ls"ls now has icons.
You can see that the previously plain ls command now has icons.

asdf Installation (version manager)
Solve node, python, go version management issues all at once.
git clone https://github.com/asdf-vm/asdf.git ~/.asdf --branch v0.10.2add to ~/.zshrc
. $HOME/.asdf/asdf.sh

# append completions to fpath
fpath=(${ASDF_DIR}/completions $fpath)
# initialise completions with ZSH's compinit
autoload -Uz compinit && compinit
ohmyzsh/plugins/asdf at master - ohmyzsh/ohmyzsh
source ~/.zshrc
Now you can run the asdf command.
Installing node with asdf
Install node plugin
asdf plugin-add nodejs https://github.com/asdf-vm/asdf-nodejs.gitInstall latest node version
asdf install nodejs latestSet node as global system-wide
asdf global nodejs latestInstalling python with asdf
Install python plugin dependencies
sudo apt-get update; sudo apt-get install make build-essential libssl-dev zlib1g-dev \
libbz2-dev libreadline-dev libsqlite3-dev wget curl llvm \
libncursesw5-dev xz-utils tk-dev libxml2-dev libxmlsec1-dev libffi-dev liblzma-dev
Install python plugin
asdf plugin-add pythonInstall latest python version
asdf install python latestSet python as global system-wide
asdf global python latestInstalling golang with asdf
Install golang plugin
asdf plugin-add golangInstall latest golang version
asdf install golang latestSet golang as global system-wide
asdf global golang latestasdf Usage Tips
asdf is a great tool for installing and managing versions of CLI tools like aws-cli, hugo, etc. Generally, tool installation follows these 4 steps as shown above:
- Install system dependencies for the tool (varies by case)
- Install the tool plugin (plugin-add)
- Install the latest version of the tool (install)
- Declare global use of a specific version (global)
Installing rust with rustup
Rust can also be installed via asdf, but problems may occur during development, so installation via rustup is recommended.
curl --proto '=https' --tlsv1.2 -sSf https://sh.rustup.rs | shA message will appear asking you to choose - select option 1 (default)
It will install cleanly.
Published:
Modified: